Saturday 14 February 2015

Red Riding Cloak

This one has been years in the 'to make' pile...

I picked up a couple of red velvety curtains in a charity shop ages ago. You know the type. As soon as I saw them I thought it'd be really fun to turn them into a hooded cloak. Just like one I'd seen, tried on, adored and ultimately walked away from at the Pittsburgh Renaissance fair a few years ago! 

Here's my how-to on making a pretty easy cloak.


Red Riding Cloak


I don't use patterns (or measurements, particularly!). I'm much more of a chop-and-go sewer, but the cloak was a pretty simple item to put together regardless. It didn't really require that level of precision to make, so apologies if you prefer more information!


Step 1: Fabric for the Body

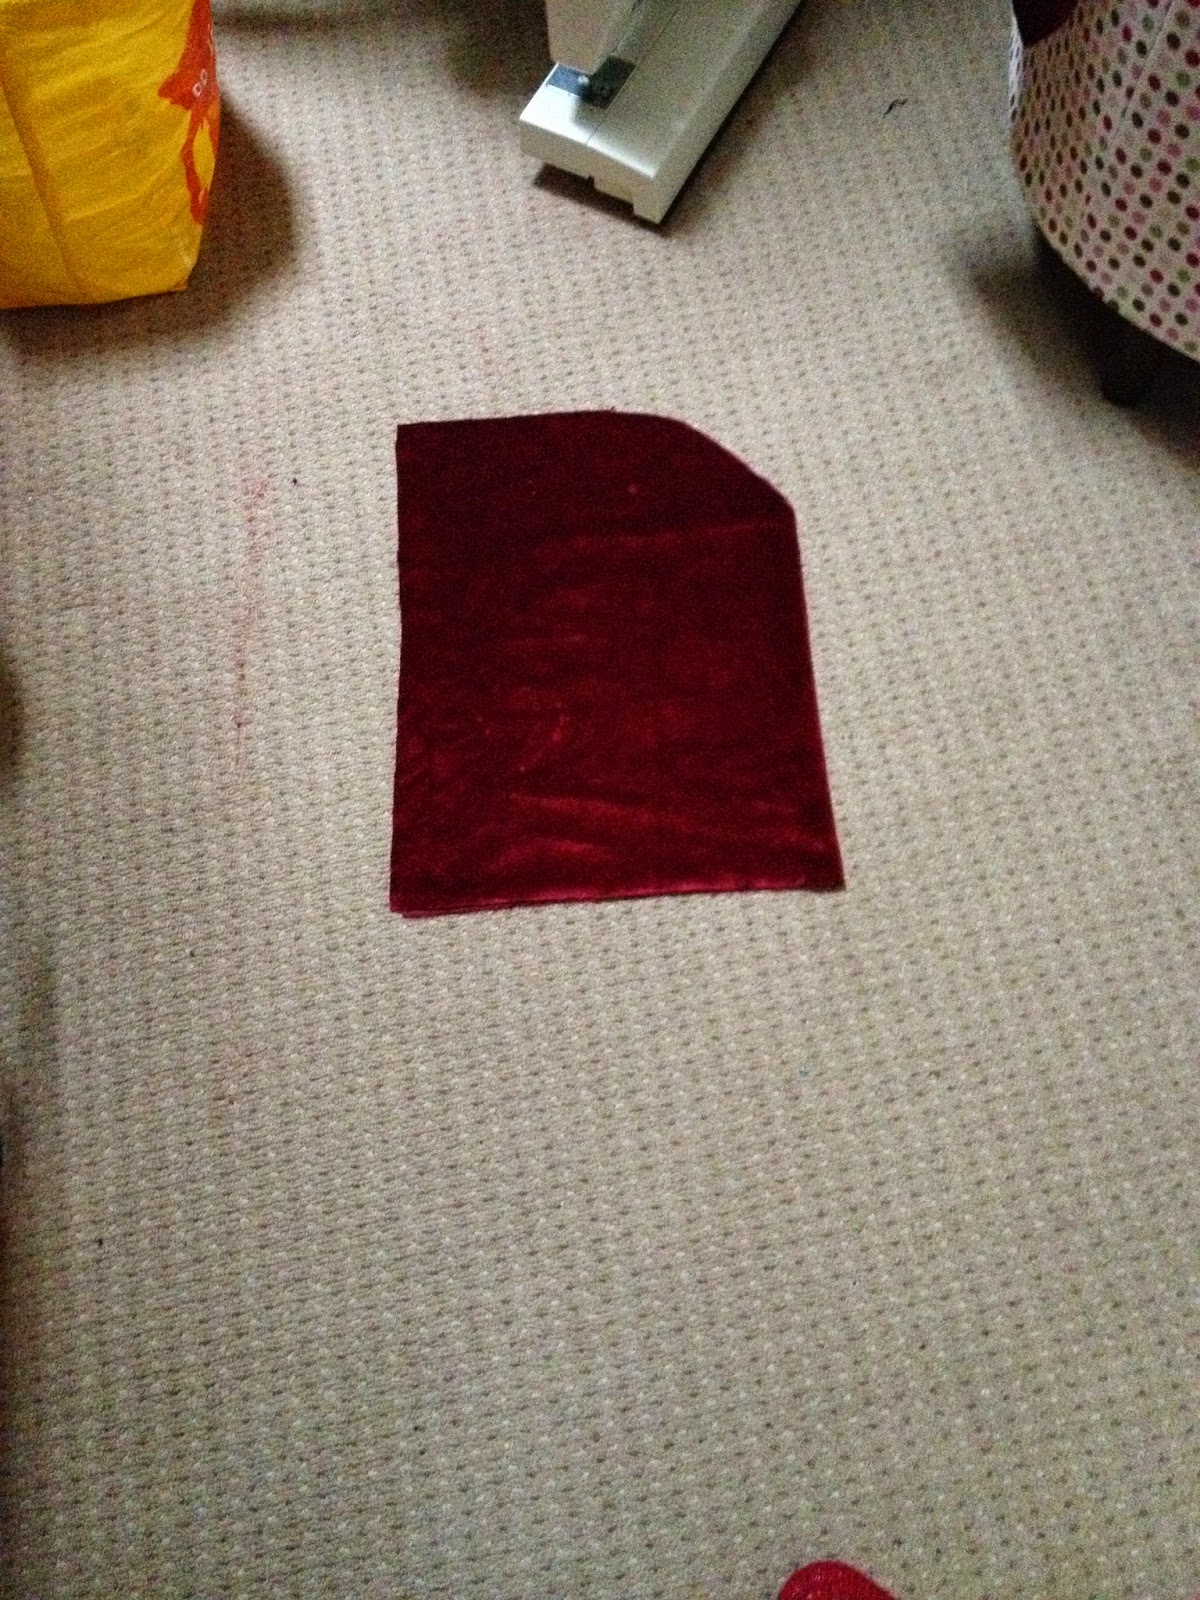
I pretty much use the curtain as I had it, just cut to size. This meant the bottom edge was already hemmed, which is always a bonus!

I 'measured' the fabric by holding it up to myself and cutting. The short edge in the picture is the top-to-bottom length. I decided to go for a roughly hip-length cloak.

I overlocked then hemmed the short edges, these end up at the front of you when you have the cloak on so keep them neat :)


Step 2: Fabric for the Hood

For the hood, I grabbed a hooded jumper that has a nice size hood on it to get a general feel for the size. I cut a rectangle (on the fold) bigger than the hood of my jumper. I then rounded it off because I didn't want a pointy hood. But that's entirely about taste.

Here it is folded and open:


I overlocked(/serged) the straight sides. It means I didn't have an additional layer to sew through in the next step.

Step 3: Lining the Hood

I had a scrap of silver satin hanging around, it was enough for the hood but just a smidge too small to line the body unfortunately. 

I cut the lining to the size of the outer fabric and 'pinned*' them down the straight sides (which will become the front of the hood). 

Because I'm not overly accurate or fond of ironing, I thought sewing right sides together and turning the right way in would result in the lining hanging out the front of the hood, which I didn't want (and everyone always gets picked up on visible lining on the Great British Sewing Bee), so I put the fabrics wrong sides together, then folded the raw edge of the silver under and folded the red over it. This might be a 'look at the pictures' kind of thing if you're not sure what I'm talking about. Hopefully it will become clear during the construction.

As I said before, I overlocked the edges, but if you haven't got that option, you'd probably want to fold that raw edge under as well, but that's 3 layers of the main material plus 2 layers of lining to sew through. 

*When I sew with thick fabrics I use bulldog clips instead of pins. Much less fuss.


Step 4: Putting the Hood Together

At this point the hood is a flat piece, sewn together down the 2 straight side edges. I then turned it inside out so that the right sides of both fabrics were facing each other. This next part requires you to sew the outer and lining to shape separately, so keep that in mind. I don't have any pictures of this part, so have improvised.

Fold the outer material, right sides together, and sew along the top curved edge (the white dotted line). The green line is where it is already attached to the lining. You just have to keep that out the way for the moment. Make sure you match up that top left corner perfectly, it will be sitting in the centre of your forehead so a mismatched edge will be very visible!


Next, do the same for the lining. Right sides together, sew along the curve. 

Here's what mine looked like at this point. You can see how the red folds into the lining.


Step 5: Gathering the Body

You need to make the top of the body piece the same width as the bottom of the hood. The best looking way to do this (in my opinion) is to gather the wider body piece. Now normally this is a fairly straightforward task. You sew 2 lines of running stitch along the edge you want to gather, then hold onto the top threads of both lines and pull the fabric along it. It's usually a simple thing. But alas, not this time! My curtain fabric was too thick. It started off well enough, and ended when the thread snapped and I had to go through the tedious process of unpicking the whole lot. 

I googled around a bit and found the technique that ultimately worked beautifully for me. I followed the advice given here. I used a piece of thick string, and a zigzag stitch which sews on either side of the string. At the end you slide the fabric along the string and it creates gathers until it's the length you need it. 


You then shuffle the gathers along until they're even.


Step 6: Attaching the Body to the Hood

Pin the hood and body together, right sides together (outer fabrics of both pieces together. Sew a running stitch along this, but take your time, the gathers will add quite a bit of extra thickness. Make sure you're catching both layers. 


Step 7: Finishing Touches

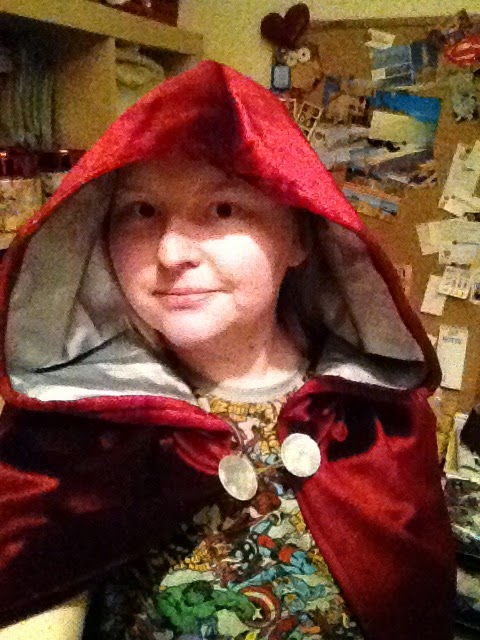
I had some ideas about the fastening at the front but as this was a stash project, I only had certain supplies to work with. I choose these massive white buttons. The ribbon wasn't overly sturdy, so I actually ended up using a hairband! 


Tudah!

Red riding cloak, all done. Nice productive afternoon :)

Sunday 18 May 2014

Superhero Panel Skirt

I have been super busy and super focused on crafts recently, so what better than to make a super skirt!


Superhero Panel Skirt

The fabric used in this is 'Springs Creative Marvel Comic Pack' from Walmart. I only bought a yard (what was I thinking?! I should have stocked up!), but I really love it. The colours are great and the comic illustrations are perfect. 


Here is the finished garment in action:


Step 1: Chop chop!

As explained in my previous post I have a thing about cutting fabric. It is especially true when I only have a single yard/metre/fat quarter/tiny amount of that fabric. But wait! What's happened to me? I hacked into this without a moment's hesitation! Ok, I did make a pattern to make sure it would be right, but still! I'm loving the new me... watch out fabric stash, I'm coming for the rest of you!

I have found much love for full circle skirts, as they are so easy! No seams to deal with or anything! I used the clear, detailed instructions at sewlikemymom.com to work out my measurements for the skirt in this post, and have kept hold of the pattern I made with it. What I chose to ignore however, was common sense. 

Here it is on my black fabric, post cutting. 


Now I had already decided that I didn't want a full circle for this skirt. I was going to be adding panels anyway, so it wasn't necessary for the look I was going for. I knew (read again - I knew, in advance) that my pattern would have a waist that would be 50% too small, because, y'know - full to a half circle skirt... I do good maths ;) "That's fine! I'll just add a couple of inches to the bottom! No worries!", I told myself. Turns out, in reality it was a lot more to trim from the waist than I thought it would be. I did have a back up design in case it ended up too short (I'm not really one for short skirts) but luckily it was just long enough. 

Use my optimism as a lesson. Do the proper measurements, folks.

Once I'd finally got my skirt cut and hanging nicely, I made a triangle paper template to ensure my panels would all be the same size. And cut them. Snip snip snip. I thought I could save fabric by interlocking triangles, but of course not. The pattern is clearly one way up.

  
I decided I wanted 4 panels, one on each side, front and back. So I lined up the black skirt (seam to the left side as I went for a zip closure), chalked lines on the centre front and back plus the right side, then cut slits half way between all of these the same length as the triangle sides.


Step 2: Sewing in the Panels

Next came some sewing. I pinned right sides of the black & hero fabrics together along one side of a panel, and sewed them. Make sure the very point of the triangle sits on the inside of your fabric. Then pin the other side the same way and repeat. And repeat, and repeat, and repeat.


Step 3: Waistband & Zip

Strangely, I don't have any pictures of the waistband until it's firmly affixed. So you'll have to just picture it in your minds instead, I'm afraid.

It was just one long rectangle of the hero fabric and one of the black fabric. Right sides together, I sewed along one long side of the 2 rectangles, then turned it the right way round and ironed it flat, making sure the black wouldn't be visible at the top. I top stitched this down to give a nice flat edge. I then put the waistband and skirt right side together (top of the skirt meeting the bottom, unstitched part of the waistband) and sewed. I started and finished either side of the skirt seam with a little extra fabric so that I could insert the zipper.

Where the fabric (both waistband and skirt) met the zip, I folded it under, pinned it down and sewed a running stitch as close as I could get to the zip (without a handy zipper foot!). Hulk approved.


All I then had to do was close up the side seam of the skirt and I had a nice new item of clothing! I later added a little Iron Man keyring to the zip pull.

And that's it. Pretty quick to do and nothing overly complicated involved. I have a million and one ideas for other skirts of the same design now!


       - Sam


Saturday 17 May 2014

The Zig Zag Summer Dress

Hello and welcome to:

The Zig Zag Summer Dress!

Huzzah!


Warning: This post will be very picture heavy!

Also, please excuse the non-professional photos. I sew, not shoot! ;)

As you might not want to trawl through the whole blow-by-blow account of its creation, here's a picture of the finished article to start us off!


Part 1: The Mock Up

Here's the background - I was sitting around one evening wanting to sew. I didn't know what or how, I just had an urge. 

Another thing I had was a big pile of offcuts, large and small, of a buckram-ish cotton material. It was fairly rough and stiff, but it gave me the scrap I needed to start playing about with shapes on Manny, my dress form. So it began with pinning and cutting it directly onto Manny, and I initially ended up with this:


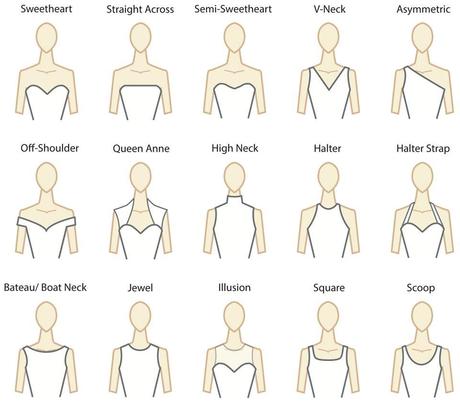
I liked it and was really pleased with the fit, but just found it a little....boring. I had a Google for wedding dress necklines, found this handy picture from Paperblog.com and immediately fell in love with the Queen Anne!


So snip snip snip... voilĂ !

 
I used a rectangle of voile I had lying around (believe me, there's a lot of fabric just 'lying around' here!) to add a pleated skirt, plus a strip of the stiff cotton for a waistband, so I could picture the dress properly as a whole. 


At this point I tacked the top together (leaving off the skirt and waistband) so that I could take it off Manny and try it on. I could then see where I needed to add/adjust any darts or pleats, which I happily didn't need to do much of! I decided against posting that picture, because you good people don't really need to see me standing around in patches of see-through fabric, believe me!


Part 2: Being Brave (aka Cutting the Fabric)


I have to admit, I'm a complete wimp when it comes to cutting nice fabric. If I have any lack of confidence or can't quite see how an idea is going to work, I'll usually put off cutting into a lovely piece. "What if it goes wrong and I've wasted it?" is the usual thought. But aha! Not this time! The fabric in question is 3 yards of Blair Simple Chevron Emerald fabric, from Walmart (purchased on a recent holiday!). As you will see, the actual colour is nothing like what's on the website!

I took apart the mock up and used those pieces as the pattern for my fabric. At this point I also numbered each piece to keep me sane! I added some seam allowance to each piece while cutting, plus a little on the bottom of each piece to increase the length of the bodice a tad. I tried to keep the 2 back pieces lined up as much as possible in terms of the stripes, as they'd meet in the middle at the zip and be really noticeable.


The last thing before pinning - I used an iron on interfacing on the whole of the front piece (the left bit in this picture). As it's a light fabric, this gave it an extra layer to 1, add support, and 2, make it a little less see-through. If I did it again though, I would also add a piece the same shape to the inside of the top part, for even more support as I found the final garment to be a little floppy around the neckline!


Part 3: It Comes Together on Top


Now it was time to pin these piece together, and start sewing. Here it is held together with pins:


And here it is, pins and all, being used as some sort of cruel and unusual punishment, during torture fitting.


The vest helped a little, but pins just have a special way of getting under your skin...

Anyway, the orange tag is just the label with the piece number. I was determined to get this right. I used this fitting to again check for any dart adjustment. All was well, so the sewing machine finally got to join the fun!

The picture on the left is how it looked when I first tried it on after sewing it all up (minus one side of the zip). I'd added too much extra seam allowance so hacked a little more off the neckline. I was really pleased with the fit, particularly around the waist!

  
I hemmed all the raw edges around the neckline and armholes (the bottom joins the waistband, so doesn't need doing yet). And thus I had a completed bodice!


Part 4: I Hate Zig Zags


Ok, so 'hate' may be a strong word. I love my dress, I adore everything about it. But the purple in the skirt took me longer than every other part of this combined.

At this point, I'd completely finished my bodice, so the rest of the fabric was for the skirt and the waistband. However, there was nowhere near the amount of fabric I needed to make the skirt the length I wanted it. It was no use making it short - I simply would never wear it. Which would be a huge waste for all the work, right? As I'd purchased the fabric while I was away, I couldn't just nip out and buy some more. So I had a little think, a little rummage, and found some purple that I decided would go beautifully. I didn't want to just chuck it on the bottom, it had to be a part of the dress, so I created a huge amount of work for myself and decided it would have to go in as part of the zig zag.

First job - cut the skirt piece into 2, along the middle of a green/blue stripe. Easy enough so far. I then had to clip all the corners of the green/blue half stripe that was left behind, in order to fold it down and create a hem along the zig zag. While I was going, I pressed each little flap down with an iron and a sneaky piece of hemming tape, to keep it all in place as I wouldn't be sewing it quite yet. 


Just to get an idea of the work involved here - it was about 2 metres of fabric. It had been cut into 2 - 4 metres of fabric. Each zig/zag gave an edge approximately twice the length from point to point - about 8 metres of edging to iron. This was an entire evening/night of work alone. I made a pledge to never use a zig zag fabric in this way again!

Finally this pointy, folding, ironing hell came to an end and I could get on with actually putting the purple in. This was just a big ol' rectangle, which I pinned the top part of the skirt to. I then sewed that on, which was another trauma in itself - I sewed a couple of inches, stopped with the needle in the fabric, lifted the machine foot, turned the fabric, foot down, and repeat. It was very slow going.

I then started pinning the bottom part of the zig zag fabric to the purple, measuring between the points to keep it even. I was really, really determined to do it right!


Just a moment to add - I hadn't realised at this point, but I'd pinned half of it to the carpet. Just something to note if you're ever pinning on the floor!

I hemmed the bottom edge of the skirt with 2 lines of top stitching.


Part 5: Skirt Assembly


I now had one big rectangle for the skirt. The pain of zig zags was over, and I was back to shapes I could handle.

I decided against the pleats of the original design. (Nothing to do with the fact the fabric wouldn't fit around my wide hips if I did it that way, of course). No - this dress wanted gathers!

I sewed 2 lines of straight stitches across the top edge of the skirt. Don't reverse stitch at either end if you do it like this, just give yourself lots of extra thread at both ends. You then hold on to the bottom threads of both lines at one end (I used a bulldog clip to hold mine in place), and then holding the other end, gently pull the fabric across to create gathers. I taped a measuring tape to the floor at the width I needed plus a little extra for attaching it to the zip. That way I could gather and adjust the gathers to be the same size all the way along without worrying I'd not have enough skirt to go round at the end of it.

Here's some pictures to show you what I mean:


Manny enjoyed trying it on when it was done. At this moment, it was just pinned in place.


Part 6: Waisting Time


The time had come to sort out that midriff. I wasn't sure if I wanted to stick with the zig zags or go with purple for the waistband, so I took these pictures of both pinned on and gave it to my Facebook friends and family to decide for me. Best way to get a decision made! Zig zags beat purple by about 7-2, in case you were wondering.


With the votes in, I constructed the waistband with minimal fuss. Just a long rectangle, folded and ironed down with some hemming tape. Done.


Easy peasy.


Part 7: It Even has an Underskirt, Like a Proper Dress n' Everything!


In my previous post, 'And a Craft Post' I wrote about a full circle skirt that I had made. I used the very handy and easy to follow Infinity Dress Tutorial at sewlikemymom.com to work out the measurements I needed and created a big paper pattern for myself. I used that pattern for creating a full circle underskirt, to give the dress skirt a bit more fullness. I was really, really lucky in that I managed to find a lining fabric that was the exact colour match to the green/blue of the zig zags. The fabric gods shone down upon me that day.


I cut a slit in the top of the lining where the zip would be and hemmed it. I then attached it the the top of the outer skirt, ready to be attached to the rest of the dress.


Part 8: The End is Nigh


I pinned on the waistband, happily it matched up (sort of) with the zig zags on the front! 


I top stitched all the way around (remember when I ironed down the edge? No need to worry about hemming!), starting and ending at the zip. 

Then it was just a matter of sewing the waistband onto the skirt (again, top stitch all the way around), closing up the seam of the skirt and securing everything in the back to the zip. The I put it on, got very excited, tired myself out and had to have a little sleep to recover. And here she is, in all her fabulous glory!


I was ultimately really pleased with how this turned out. The whole thing was a bit cut and go - no pattern, just guessing and estimating and hoping for the best. Of course there are things I would change if I did it again (did I mention the zig zag aggro?!), for one I didn't get the straps how I wanted them. And as mentioned way back when, I'd add more lining to the top to provide more structural support. Oh, and I also cut a freaking hole in the top at the back with pinking shears while trying to snip off some extra hem on the inside!! So next time - yeah, I'll try to avoid that!

Overall though, I'm really happy with it. I love it, and knowing you can wear an outfit that you've made for yourself, from scratch, is a fantastic feeling. It fits perfectly, and makes me happy just having it on!


Many thanks for sticking with such a long post! I hope this inspires you to give it a go too!

    - Sam